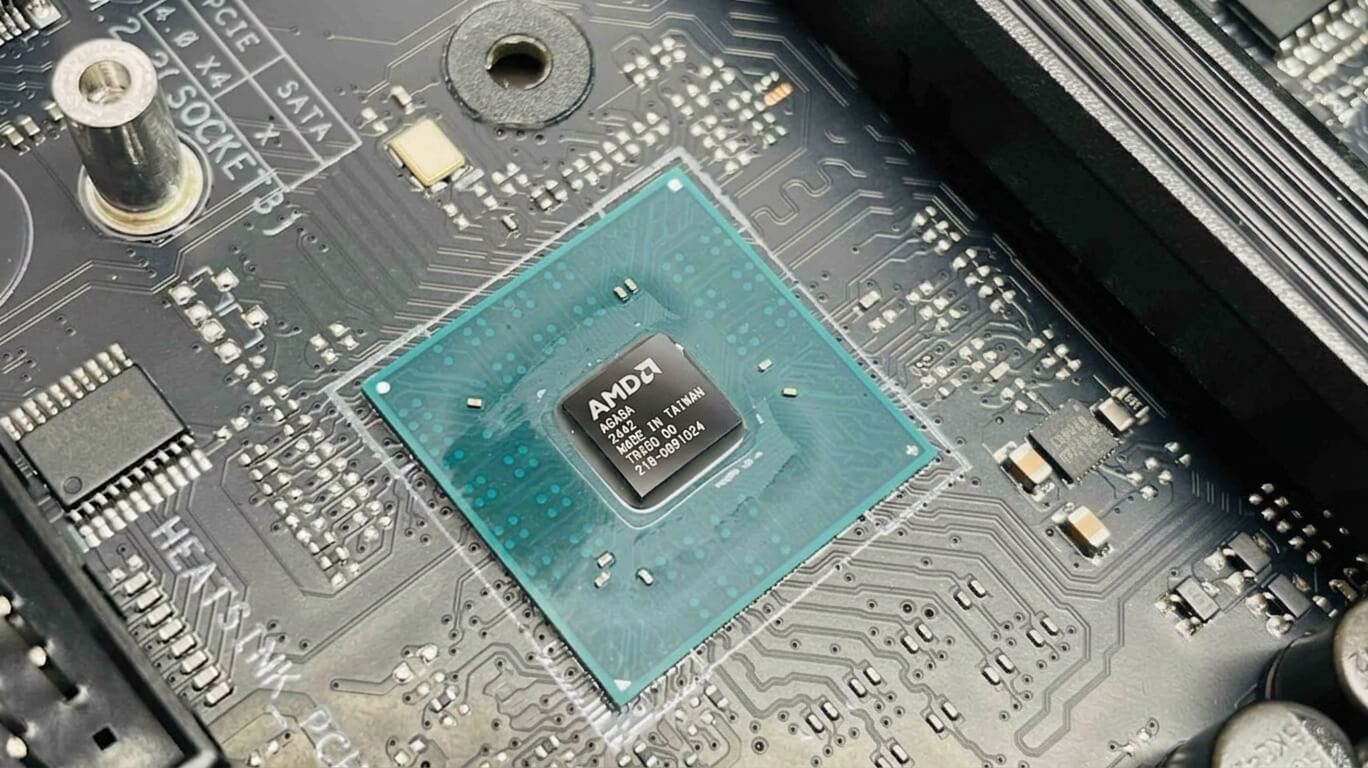
A motherboard chipset is the set of integrated circuits that manages communication between the CPU, memory, storage devices, and peripheral connections on a computer’s motherboard. Every desktop and laptop motherboard includes a chipset, and the specific chipset installed determines which processors the board supports, how many storage and USB devices it can run, and whether the system can be overclocked.
Chipset selection affects nearly every practical aspect of building or buying a computer. A gaming PC that needs multiple NVMe drives and a high-bandwidth graphics card requires different chipset capabilities than an office PC used for word processing and web browsing. The chipset also ties directly to the CPU socket, so choosing a chipset is inseparable from choosing a compatible processor generation.
Manufacturers such as Intel and AMD release chipsets in tiers, from entry-level models with reduced connectivity to enthusiast-class models built for overclocking and maximum expansion. Each tier trades cost against features such as PCI Express lane count, USB port speed, memory overclocking support, and the number of storage drives the board can run at full speed.
This article explains what a motherboard chipset is, where it sits on the board, what it does, and how it differs from the CPU and the motherboard itself. It also covers how to identify the chipset already installed in a system and how to match a new chipset to a CPU socket, use case, and budget.
What Is a Motherboard Chipset?
A motherboard chipset is an integrated circuit, or a set of integrated circuits, that manages data traffic between the CPU and the motherboard’s other components, including memory, storage controllers, USB ports, and expansion slots. The chipset is physically soldered onto the motherboard and cannot be removed or upgraded independently of the board itself.
The chipset determines the practical limits of a motherboard’s connectivity. It controls how many SATA and M.2 storage devices the board can support, how many USB ports are available and at what speed, and how many PCI Express lanes are accessible for graphics cards and add-in cards. Modern desktop chipsets from Intel and AMD also govern whether the CPU and memory can be overclocked, since overclocking support is a chipset-level feature rather than a universal CPU capability.
Chipset vs. a Single Computer Chip
A chipset differs from a single computer chip because a chipset is a coordinated set of circuits designed to manage multiple types of data traffic, while a single chip typically performs one defined function. A CPU, for example, is a single chip focused on executing instructions, while a chipset routes signals between the CPU and the rest of the motherboard.
Early chipsets consisted of two separate physical chips, the northbridge and the southbridge, each handling a distinct group of tasks. Most modern desktop chipsets from Intel and AMD consolidate these functions into a single physical chip, called the Platform Controller Hub (PCH) on Intel platforms, while still performing the combined role that two chips previously handled. A chipset therefore functions as a coordinated control layer rather than a single-purpose component.
Where the Chipset Sits and How It’s Built
The chipset sits on the motherboard between the CPU socket and the board’s peripheral connectors, including SATA ports, M.2 slots, USB headers, and some PCI Express slots. It connects to the CPU through a dedicated high-speed link, such as Intel’s DMI (Direct Media Interface) or AMD’s equivalent chipset link, and distributes that connection outward to the components it manages.
Physically, the chipset is a single soldered package on most modern motherboards, positioned near the CPU socket and typically covered by a heatsink. Higher-tier chipsets that manage more lanes and ports generate more heat and often use larger heatsinks or active cooling. The chipset’s placement and wiring are fixed by the motherboard manufacturer and cannot be modified after the board is built.
Northbridge, Southbridge, and the Modern PCH
The northbridge and southbridge were two separate chips used in older motherboard designs, with the northbridge managing high-speed connections to the CPU and memory, and the southbridge managing lower-speed peripherals such as USB and SATA. This two-chip design was standard on desktop motherboards through the mid-2000s.
Intel and AMD have since moved most northbridge functions, including memory and PCI Express controllers, directly into the CPU itself. The remaining peripheral-management functions are now handled by a single chip. Intel calls this chip the Platform Controller Hub (PCH), while AMD refers to it simply as the chipset. This consolidation reduced the number of physical components on the motherboard and shortened the data path between the CPU and connected devices, improving both manufacturing cost and signal latency.
What’s Inside a Chipset (Integrated Circuits)
A chipset contains integrated circuits that manage I/O controllers, PCI Express lane switching, USB host controllers, SATA controllers, and clock generation for the motherboard. These circuits are fabricated onto a single die or a small number of connected dies within the chipset package.
The I/O controllers manage data flow to storage devices and expansion cards, while the USB host controller manages power delivery and data transfer for connected peripherals. Clock generation circuitry synchronizes timing signals across the board’s components. Higher-tier chipsets include additional circuitry to support features such as PCIe lane bifurcation, RAID configurations across multiple drives, and expanded overclocking controls, which increases both the chipset’s die size and its power consumption compared with entry-level models.
What Does a Motherboard Chipset Do?
A motherboard chipset manages communication between the CPU and the board’s storage devices, USB ports, expansion slots, and other peripherals, while also controlling system-level features such as overclocking support and power delivery configuration. It acts as the coordination layer that determines what a motherboard is capable of, independent of which CPU is installed.
The chipset allocates PCI Express lanes among graphics cards, M.2 storage drives, and add-in cards, and it sets the maximum number and speed of USB and SATA ports available on the board. It also manages the DMI or equivalent link to the CPU, which limits the total bandwidth available to chipset-connected devices. On enthusiast-tier chipsets, it enables CPU and memory overclocking by exposing adjustable voltage and frequency controls in the BIOS/UEFI; entry-level chipsets typically lock these controls or omit them entirely.
Types of Motherboard Chipsets
Motherboard chipsets are divided into tiers, typically entry-level, mainstream or performance, and high-end or overclocking-focused, with each tier tied to a specific CPU socket and generation. Intel’s current 800-series lineup for its LGA1851 socket includes H810 (entry-level), B860 (mainstream), and Z890 (high-end, overclocking-enabled), alongside the business-focused Q870 and workstation-focused W880. AMD’s current AM5 lineup includes A620 and B840 (entry-level, no CPU overclocking), B850 and B650 (mainstream), and X870/X870E and X670/X670E (high-end).
Each tier differs primarily in PCI Express lane count, USB port speed and quantity, storage expansion, and overclocking support. Entry-level chipsets provide the fewest lanes and ports and generally disable CPU overclocking, while high-end chipsets provide the most PCIe 5.0 lanes, the highest-speed USB ports, and full overclocking control for both the CPU and memory. Mainstream chipsets sit between these two extremes, often supporting memory overclocking while restricting or omitting CPU overclocking.
Entry-Level vs. Performance vs. Overclocking Chipsets
Entry-level, performance, and overclocking chipsets differ mainly in PCI Express lane allocation, connectivity, and whether they unlock CPU overclocking. Entry-level chipsets, such as Intel’s H810 or AMD’s A620, provide the minimum PCIe lanes and USB ports needed for basic desktop use and do not support CPU overclocking, though some allow memory overclocking through XMP or EXPO profiles.
Performance chipsets, such as Intel’s B860 or AMD’s B850, add PCIe lanes, additional M.2 slots, and faster USB ports, targeting mainstream gaming and productivity builds. Overclocking-class chipsets, such as Intel’s Z890 or AMD’s X870E, provide the highest lane counts, the most USB and storage connectivity, and full voltage and frequency control for both the CPU and memory. This tier suits users running high-core-count CPUs, multiple GPUs or add-in cards, or sustained overclocked workloads.
Chipset vs. Processor (CPU): What’s the Difference?
A chipset and a processor differ in function: the CPU executes program instructions and performs calculations, while the chipset manages data traffic between the CPU and the motherboard’s other components. The CPU is the system’s primary computing engine; the chipset is a supporting circuit that extends the CPU’s connectivity to storage, USB, and expansion devices.
Modern CPUs from Intel and AMD integrate some functions once handled by the chipset, including the memory controller and a limited number of PCI Express lanes for the primary graphics card and boot drive. The chipset supplies the remaining lanes and ports needed for additional drives, USB peripherals, and expansion cards. A CPU can physically install into any motherboard using a matching socket, but the chipset on that motherboard determines features such as overclocking availability and the total number of usable ports, regardless of which CPU is installed.
Motherboard vs. Chipset: What’s the Difference?
A motherboard is the complete printed circuit board that houses the CPU socket, memory slots, expansion slots, and all connectors for a computer system, while the chipset is one component soldered onto that motherboard. The chipset is a single element within the motherboard’s overall design, comparable to how a fuel injection system is one component within a complete engine.
A single chipset model, such as Intel’s Z890 or AMD’s B850, can appear on motherboards from multiple manufacturers, including Asus, MSI, Gigabyte, and ASRock, each offering different physical layouts, VRM quality, port arrangements, and price points while sharing the same underlying chipset capabilities and limits. Choosing a motherboard therefore involves two separate decisions: selecting a chipset tier that matches the required features and CPU compatibility, then selecting a specific board model built around that chipset for factors such as size, build quality, and connector placement.
How to Find Out Which Chipset Your Motherboard Has
A motherboard’s chipset can be identified through the operating system’s system information tool, the BIOS/UEFI setup screen, or the manufacturer’s product specifications page. Each method reads the chipset information directly from the installed hardware or from the board’s model number, so any of the three approaches produces an accurate result without requiring the case to be opened.
Check It in Windows System Information
To check a motherboard’s chipset in Windows, open the Start menu, type “System Information,” and press Enter, then locate the “BaseBoard Product” field, which lists the motherboard model. Cross-referencing this model number on the manufacturer’s website identifies the exact chipset used.
Windows System Information does not display the chipset name directly, so a second step is required. Third-party utilities such as CPU-Z provide a more direct route: opening CPU-Z and selecting the “Mainboard” tab displays the chipset name in the “Chipset” field without needing to look up the motherboard model separately.
Check It in BIOS/UEFI
To check a motherboard’s chipset in BIOS/UEFI, restart the computer and press the manufacturer-specified key, commonly Delete or F2, during startup to enter the BIOS/UEFI setup screen, then locate the system information or main overview page. Most BIOS/UEFI interfaces display the motherboard model and chipset name on the initial or “Main” tab.
The exact key and menu layout vary by motherboard manufacturer, so checking the board’s manual or the manufacturer’s support page confirms the correct entry key if the default options do not work. Once inside the BIOS/UEFI, the chipset name typically appears alongside the BIOS version and installed memory information, requiring no additional software.
Check the Manufacturer’s Specs Page
To check a motherboard’s chipset through the manufacturer’s specs page, locate the exact model number printed on the motherboard or listed in system information, then search that model number on the manufacturer’s official website. The product specifications page lists the chipset as one of the primary listed attributes, along with the supported CPU socket and memory type.
This method works even when the computer cannot boot, since the model number is printed directly on the motherboard’s surface, usually near the CPU socket or PCI Express slots. Manufacturer specification pages also list the chipset’s supported features, including maximum memory capacity, PCIe lane configuration, and overclocking support, which is useful when confirming compatibility for an upgrade.
How to Choose the Right Motherboard Chipset
Choosing the right motherboard chipset requires matching the chipset to the target CPU’s socket and generation, matching its feature set to the intended use case, and balancing its tier against the available budget. These three factors apply in sequence: socket compatibility determines which chipsets are physically usable, feature requirements narrow the usable chipsets to those with the necessary connectivity, and budget determines the final selection among the remaining options.
Skipping any of these three checks commonly results in either an incompatible purchase or an overspend on features that go unused. A chipset that supports overclocking provides no benefit to a system that will never be overclocked, while a chipset with too few PCIe lanes limits future storage or expansion upgrades regardless of price.
Match the Chipset to Your CPU Socket and Generation
To match a chipset to a CPU, confirm that the chipset’s supported socket and processor generation align with the specific CPU being installed, since a chipset from an incompatible socket cannot physically accept the processor. Intel’s current LGA1851 socket, used by H810, B860, Q870, W880, and Z890, supports Intel Core Ultra Series 2 (“Arrow Lake”) processors, while AMD’s AM5 socket, used by A620 through X870E, supports Ryzen 7000, 8000, and 9000 series processors.
Within a compatible socket, chipset generation can still affect available features even when physical installation succeeds. A newer chipset generation on the same socket, such as AMD’s X870E compared with the earlier X670E, may add standardized features such as USB4 support that were previously inconsistent across the older generation’s motherboards. Confirming both socket match and chipset generation prevents compatibility issues and ensures the intended CPU features are fully supported.
Match Features to Your Use Case (Gaming, Overclocking, Connectivity)
To match a chipset to a specific use case, identify the number of high-speed storage drives, USB devices, and expansion cards the system needs, then select a chipset tier that provides sufficient PCIe lanes and ports for that configuration. A gaming system with a single GPU and one or two NVMe drives can run adequately on a mainstream chipset such as Intel’s B860 or AMD’s B850, while a workstation running multiple NVMe drives, additional expansion cards, or high-speed external storage benefits from a high-end chipset with more available lanes.
Overclocking requirements narrow the selection further, since only top-tier chipsets, such as Intel’s Z890 or AMD’s X870E and X670E, unlock full CPU overclocking controls. Systems that will not be overclocked can use a lower tier without losing relevant performance, since overclocking support has no effect on a system running at stock CPU settings. Connectivity needs, including USB4, Wi-Fi 7, and multiple M.2 slots, are also concentrated in higher chipset tiers, so users prioritizing these features generally need to select from the upper half of a given chipset lineup.
Balance Chipset Tier Against Budget
To balance chipset tier against budget, compare the cost difference between chipset tiers against the practical value of the additional features each tier provides for the intended use case. A mainstream chipset such as Intel’s B860 or AMD’s B850 typically costs less than a high-end chipset such as Z890 or X870E while covering the storage, USB, and connectivity needs of most gaming and general-use systems.
Overspending on chipset features that go unused, such as CPU overclocking support in a system that will run at stock settings, reduces the budget available for components with a more direct performance impact, including the GPU, CPU, and memory. Conversely, selecting a chipset tier too far below the system’s storage or expansion requirements can force a costlier motherboard replacement later. Reviewing the specific PCIe lane count, M.2 slot count, and USB configuration listed on the manufacturer’s specifications page, rather than relying on the chipset tier name alone, confirms that a given board meets the system’s requirements at its price point.
High-performance gaming PCs built for gamers, creators, and competitors.
More From The Journal
Motherboard: Definition, Function, Sizes, Components
Learn what a motherboard is, what it does, how form factors differ, and which core parts like sockets, chipsets, VRMs, slots, ports, and headers matter most.
How to Choose a Motherboard: A Complete Buying Guide
Learn how to choose a motherboard by comparing socket compatibility, chipset features, RAM support, PCIe slots, storage options, rear I/O, and power delivery.